Posts

Showing posts from July, 2016

WEEK TEN: July 26, 2016

1. Worked on the netting for the payload. ( Melissa ) 2. Troubleshoot the accelerometer. ( Everyone )

WEEK TEN: July 25, 2016

1. Worked on preparing the netting for the payload. ( Melissa, Sofia ) 2. Shimmed the GoPro cameras. ( Patrick ) 3. Worked on sound experiment. Increased duration of the output. ( Nicholas )

WEEK NINE: July 20, 2016

Image
1. Work on presentation. ( Everyone, mostly Patrick ) 2. Find website that calculates the fill volume, ascent rate, neck lift, and time to burst. The website is here . ( William ) SEE PICTURE 1 PICTURE 1 :   

WEEK NINE: July 19, 2016 - Pre Test Launch

Image
We made several modifications to the test launch for the test launch. We originally wanted the balloon tethered up to about 250 feet. However, the wind could apply enough drag force to break the 100-pound-test tether. To accommodate for this, we tripled the line and sent the balloon to about 75 feet up in the air. We had a lot of fun keeping the balloon from being blown into the ground. The BeagleBone recorded two hours of data while we prepared the payload and the balloon. Of the 30-45 minutes of flight time, the BeagleBone recorded 7-8 minutes of data. Our computer couldn't record data for the rest of the flight because its connection to the power supply loosened and the power supply itself wasn't properly secured. As for the components, they worked as intended except for the accelerometer. The two SpotGPS reported the balloon's location accurately. SEE SPOTGPS DATA . Despite the low flight altitude, the APRS managed to pinpoint its location as well. For some reason,

WEEK NINE: July 18, 2016

Image
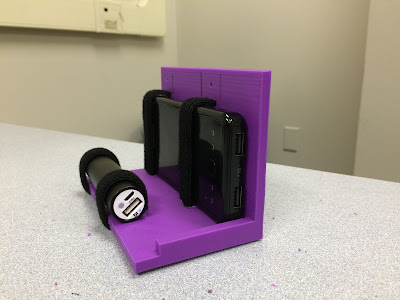
1. Finished the procedure checklist. ( Sofia, Patrick ) 2. Finished the payload basket. ( Melissa ) SEE PICTURE 1 3. Tested the programs and equipment. ( Nick, Peter ) All the programs but the accelerometer program work as intended. For some reason, only the y-axis of the accelerometer reads a value of about -1.4 g regardless of the orientation.  A hardware connection is the prime suspect. 4. Brainstormed ways to attach the group picture to the bar for the final launch. ( Luis, Melissa, Patrick ) The best idea seems to be attaching the picture to an aluminum sheet and welding the sheet onto the bar. We also measured the ideal distance between the picture and the GoPro, which is 1 foot. 5. Attached picture to the bar for tomorrow's launch. ( Professor Balzarette, Melissa, Patrick ) We temporarily spray-glued the picture onto a sheet of ABS plastic and secured the sheet onto a notch in the bar with industrial strength hot glue. SEE PICTURE 2 We are now prepared for tomorrow

WEEK EIGHT: July 14, 2016

1. Begin developing a basket to secure the payload ( Melissa, Sofia, Peter, Robert ) SEE SLIDESHOW 2. Begin testing programs and equipment. ( Patrick ) 3. Develop procedure for balloon assembly at launch. ( Sofia ) 4. Assemble the 1.5 inch diameter inflator tube for the tethered launch. ( Luis ) Slideshow

WEEK EIGHT: July 13, 2016

Image
1. Look into the capacities of the balloons. ( Nick, Peter ) According to the company we purchased the balloons from, the capacities are:   2. Work on exploded view of and research methods to create a basket for the payload. ( Melissa ) We will work on the actual production of the basket tomorrow. 3. Assemble part of the inflation tube for the tethered launch. ( Luis, Professor Balzarette, Patrick ) Sand the lip of the tube, which will prevent any sharp edges from tearing the balloon. SEE PICTURE 1 4. Begin developing a step-by-step procedure of assembling the balloon and the payload at the launch site. ( Everyone )  Picture 1

WEEK EIGHT: July 12, 2016

Image
1. Researching methods for converting voltage to decibels. ( Nick, Patrick ) We found a method that looks promising, and we will continue experimenting with it tomorrow. 2. Continue work on the exploded view of the payload. (Melissa ) 3. Brainstorm ideas for attaching the payload. ( Everyone - William/Billy + Luis ) Since wrapping the entire box with duct tape may cause interference with our GPS sensors, securing the payload with a nylon netting would be best. 4. Experiment with a knotting technique -- the knot at 1:05 in the video below -- using fishing line. ( Everyone - Billy - Nick ) SEE PICTURES 1 & 2 5. Weigh the payload. With the modifications made from yesterday, the payload now weighs 5 pounds 14 ounces, which is below the maximum of 6 pounds. Picture 1 Picture 2

WEEK EIGHT: July 11, 2016

Image
1. Work on exploded view of the payload and components. ( Melissa ) 2. Modify the battery case. ( Sofia, Patrick ) SEE PICTURE 1 Picture 1

WEEK SEVEN: July 7, 2016

1. Test GPS sensor . GPS data, altitude included, is accurate. ( Nick, Sofia ) SUCCESS 2. Foam in cracks and crevices that impact the structural integrity of the payload. ( Sofia, Patrick ) 3. Research methods for converting the speaker voltage to decibels. Decibels may be inferred by calculating intensity. ( Everyone )

WEEK SEVEN: July 6, 2016

Image
1. Test on board GPS again. ( Everyone ) Works when you remove the time.sleep line in the code. 2. Foam in GoPro cradles. ( Patrick, William ) All pieces are foamed into the payload now. 3. Test accelerometer . ( Everyone ) Graph 1 are the test values for the x,y, and z axes. GRAPH 1 :

WEEK SEVEN: July 5, 2016

1. Test on board GPS . Initialize the GPS outside to see if that fixes the erroneous data. ( Patrick ) Worked the 3rd time. 2. Begin foaming in the 3D printed parts to obtain a fixed position and install the copper tubes for pressure equalization. ( Billy, Nick ) Both Spot GPS cradles, APRS cradle, circuit cradle, and beagle bone cradle have been foamed in. Will foam in the GoPro cradles tomorrow.