Posts

Showing posts from June, 2015

30 June 15

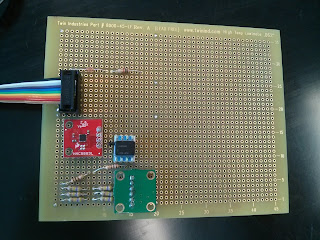
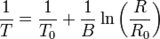
We have begun doing research on the calculations on how we plan to fill this balloon. We need to know a few things, such as how many cubic feet we need to put into the balloon. How much lift that will generate/how much is needed. What the diameter will be at several different altitudes, and when the burst diameter will be reached. We also want to be able to predict the flight path of the balloon. A couple of resources we have accumulated for this include: Flight Predictor Burst Predictor Prelim Equations More Equations Our initial goals are: Ascent Rate: 5m/s Burst Altitude: 35,000 Meters Descent Rate: 3-5m/s Payload weight: 6lbs (mass: 2.7kg) Balloon type: 3000 gram (Oops, that's a little big) Also we received the SD cards for the GoPro today, 2x 64Gb Samsung Evo SD Cards . We have been testing the settings on the gopro and think we are going to settle for something like the 10MP Time Lapse with an interval somewhere along 1-5 seconds.

29 June 2015

It's been a while since our last post. Last week we only had one day where the whole team was in, and they were split up on separate tasks. We had a whole bunch of people get sick, now though we are back up to full strength. We had a couple of important parts arrive, all relevant links will be at the bottom of this paragraph. The battery that we will be using to power everything has arrived. The APRS tracking device has also arrived, this will send gps data as well as a couple of other datapoints back to us live via the APRS network that we can monitor from aprs.fi . The unit also came with a half wave dipole antenna The spot gps' that will be used as backup gps tracking have also arrived, however these by government regulation automatically deactivate above 35,000 feet altitude. Battery APRS Spot GPS We have been testing both the beagle sensor array and the APRS unit while away from the STEM lab. We were able to make the python script that does our datalogging run at sta

17 June 15

Yesterday we were able to get the gps read code and all of the other programs together into one called main.py. It samples the gps and outputs the date and timestamp as well as the relevant position information. It also samples all of the experiments and puts all of the data into 2 files. One is for the calculated data and one is for the raw ADC values in case we want to use them later on. They are stored in CSV files which we will use excel to analyze later on. Edit: This post was saved instead of posted by accident, it was drafted on the 17th of June, contrary to the post date.

18 June 15

Yesterday we completed the code for the I2C driven magnetometer. Counting all sensors we are now able to measure the following parameters: 3 Axes of Acceleration (g's) 3 Axes of Magnetic Field Strength (Gauss) Internal Temperature (Kelvin) External Temperature (Kelvin) Barometric Pressure (Kilo Pascals) GPS Position Data. Only sensor left to get up and running is the sound sensor We ended up having to solder together a second ribbon cable, only 2 connectors of which are used to link the gps serial lines. 2 more will be used for the sound sensor. Last evening I took the gps home and allowed it to run for quite some time under the sky. I was reading a book and periodically checked on it, but the first time I noticed it had gps lock was after ~45 minutes. After that the lock was intermittent since where I had set it up was under some large trees. Once it was moved into a clear area it had no problem maintaining lock. A bug was discovered in the code and fixed. The gprmc var

16 June 15

Yesterday we were able to get a serial link (9600 baud) between the GP-635T Gps Reciever and the Beaglebone. We were able to receive the nmea sentences  ( GLL,  RMC,  VTG,  GGA,  GSA,  GSV) and decode the data out of them using the packages pyserial and pynmea. However we struggled to get a gps lock, although in the gps data it indicated that it had between 8 and 15 satelittes "in view" at any given time. Although they were in view the signals may not have been strong enough to calculate a fix. Regardless we are going to try again and get the gps to lock now that we have a data stream coming from it today.

15 June 15

Last Thursday we were able to complete the connection between the beagle and the protoboard. We also were able to test it and verify that all sensors were working properly. We had to re-calibrate them to compensate for the additional resistance in the ribbon wire and the beagle cape connector. After we were able to finish that we soldered together an external thermistor onto a 4-wire ribbon cable and soldered it down to the beagle cape connector. The whole assembly is just a 1k ohm resistor in series with a thermistor, with both ends soldered to the red and black wires respectively. The center of the two, where we read the voltage was soldered to the green wire and connected to the analog to digital converter. This was also able to read temperatures accurately which we tested by using a cup of ice water.

Finalized connection and Calibration

Image
This morning we drew up a diagram of the connections that should be made on the beaglebone connector in  GIMP . This was based on the pin assignments in our blog post from the 9th of June and the  Map of the Beagle Cape Expansion Headers . After the diagram was made we got to soldering and ended up with our completed connector: Then for the Moment of truth, to connect the ribbon cable to the sensor protoboard and test to see if it works... It Does! Now we can calibrate the accelerometer in its final form. What we did to calibrate it is hold the board in the full negative and full positive directions for each axis and record the maximum and minimum voltages shown below: X max: 1.914 X min: 1.276 Y max: 1.939 Y min: 1.289 Z max: 1.994 Z min: 1.350 The average of each maximum and minimum was taken. This represents the zero offset X offset: 1.595 Y offset: 1.614 Z offset: 1.672 Then the difference between each offset and the minimum was taken, since this is a measured d

11 June 15

Yesterday we began building the board that is going to connect to the beagle. We soldered all the header pins required to plug it into the whole P9 connector on the beagle. We then took the board down to the machine shop and had the small part of the board that we will be using for the connector cut out of the 4"x5" protoboard. At the end of the day we were able to also soldler on the ribbon connector to the board. Today we would like to solder the pins from the ribbon connector to the header pins. This will enable us to test all of our sensors with only one connection cable. Peter has been tasked with getting the computer vision team up to speed so we have not been able to debug a lot of code but once we have the ribbon connector completed we will be able to continue work on the code without having to worry about hardware faults.

10 June 2015

Image
Yesterday we officially assigned which sensor will be going to what port on the beagle. We are trying to move away from the prototyping stage and begin merging the programs into our final script that we will be using during the flight. We were also able to get the ribbon connector mounted, and soldered to all of the data and power wires. We also took another blank protoboard and soldered on enough pins to cover the whole P9 connection header, we are going to cut out this small piece of pcb plus 4 rows. We will then solder onto it a ribbon connector, and connect the correct pins from the ribbon to the headers. In theory this will allow us to only have to plug the header board into the beagle, and a ribbon cable between the boards to hook all of the sensors up.

9 June 15

Yesterday we researched how to send and receiver information over I2C in our language of choice, Python. We installed the SMBus and the Adafruit I2C libraries for Python on the Beaglebone Black.  We started work on the Python program which will run the magnetometer. A little bit about the Magnetometer from the datasheet: It has 3 independent axes which represent x,y and z It is accessed over I2C It has 12 bits of precision Read address is at 0x3D, Write address is 0x3C It can be set to read from +/- 0.88 Gauss up to +/- 8.1 Gauss We have chosen to operate in the +/- 1.3 Gauss mode because we don't expect to see more than 0.65 Gauss (the strength of the earth's magnetic field) but we want to be able to read larger values in case we encounter some sort of anomaly. You can find our source code here .  The program is called magetometer.py. This morning we received the ribbon cables, and connectors we are planning to use to hook up the sensor board to the Beaglebone, so we

An I2C Aside

Image
I2C ( pronounced I squared C ) as it is commonly written is a communication protocol designed to allow small, low level (read: very close to the hardware, not easy to read the code) devices to communicate with each other. I first encountered it while competing in the First Tech Challenge Robotics competiton. Anyone who has every played with Lego Mindstorms will recognize the sensors and phone cables ( Source ) These sensors communicate with brain brick over I2C. In the world of small electronics there are a lot of useful devices that use I2C to communicate, for instance our magnetometer. I thought it would be useful to write up my understanding of the protocol here for future teams use as well as anyone else trying to use it. I2C runs on 2 wires, SCL or the clock line, and SDA or the data line. The clock line is what times the slave devices and enables them to stay in sync. This is set and run by the master device(s). The data line is the actual zeros and ones going to and coming

8 June 15

Image
We created the thermistor circuit on June 4 and wrote the code to read it.  It it composed of a 1,000 ohm (1kohm) resistor connected to a 1.8V rail, in series with the thermistor connected to the ground rail. Voltage is measured by the beagle between the resistor and the thermistor, telling us the voltage drop across the thermistor. Using this, the value of the known 1K resistor, and the supply voltage of 1.8V we can calculate this instantaneous resistance of the thermistor using the formula: R = 1K / ((1/ADC) - 1) (Formula modified from Adafruit  note: same page a last post linked to ) Using the resistance and the formula listed in our previous post, we were able to calculate the temperature that the thermistor should be sensing. Note: Since our thermistor has a negative temperature coefficient (listed in the datasheet ) we expected to see  the resistance of the thermistor decreases as the temperature increases, which is in fact exactly what happened experimentally. Our code can

4 June 15

Image
Yesterday we went to Sandvik for a tour of the facilities in Fairlawn. They also brought along their NHRA Top Fuel Dragster and its team and driver. We were given demonstrations on the CNC tools and high precision drilling as well as techniques used for high speed milling. On Tuesday we have a minor incidence with a beagleboard. We overloaded one of the input pins and that somehow has Bricked the board. Unfortunately some of our new programs were on the board, however most of our important code was saved to Github. We were trying to read serial GPS data from the sensor so only that code was lost. Today we received our thermistors so today we will be learning about thermistors and how to use their values to obtain temperature. Our goal is to have a program that will be able to read temperature from the thermistor resistance by the end of the day. Thermistor Data: Resistance 1,000 Ohm Tolerance ±10.0% Accuracy 25 °C [77 °F] Beta 3348 Operating Temperature -60 °C to 300 °C [-76 °F

2 June 15

Yesterday we were able to get the ground and voltage rails soldered onto the protoboard. We then hooked the barometer and the accelerometer to a common ground and 3.3V source from these rails. We are now able to test and read values from the protoboard. However the signal wires from the middle of the voltage dividers are still floating. The next thing we need to requires us to have the connectors we ordered from sparkfun. We will be soldering the ground, 3.3v rails and all of the sensor outputs to a ribbon connector. This will be what connects the beagle to the protoboard. Today Eric brought in a GPS module from home for us to attempt to read data from it, we ordered one of this model (GP-635T) from sparkfun yesterday.

1 June 15

During our last meeting we were able to get the Accelerometer and the Barometer soldered onto the protoboard, along with the Resistors that we will be using as voltage dividers. The sensors are being calibrated by placing the board into a position where only 1 axis should be measuring any acceleration from gravity. The voltage of that axis will be taken, and then the device flipped 180 degrees so the specific axis is now in the opposite direction of gravity. This will result in the voltages that represent 1g and -1g. The middle point will be used and the Zero Offset and the difference between the Zero Offset and 1g will be used as sensitivity. Peter is also debugging the program and is attempting to add an algorithm that will calculate velocity using the acceleration obtained from the acceleration sensor. We are also order some more parts in order to connect the protoboard to the beagle. We are ordering ribbon cables and connectors. Pin headers which we will use to create a connector t

28 May 15

 Last evening Elshama, Peter, Elizabeth and Eric went to a meeting over at the Bergen Academies Maker Space for their High Altitude balloon project. We were able to discuss with their team about using Amateur Radio and APRS tracking to GPS track the balloon. We also observed their sensor package and the arduino code that runs it. They also gave us an source for the parachute since our original source Has gone out of Business. Today we are starting construction on the Protoboard which will house all of the sensors. We are going to get the voltage dividers and the breakout board soldered onto the board.

27 May 15

 Today the values for the ZeroOffset and the sensitivity were calculated as in the detailed notes attached. These values were tested and were found to be accurate with a little but of fine tuning required. They were hard coded into our program and will be used to calculate the acceleration that the balloon is experiencing. We may use some vector math later on to also calculate the orientation of the balloon

26 May 15

We brought on a few new members, we now have Elizabeth Ramirez, Prasha Das, Christian Lee, Jonathan Avila and Joan Madera in addition to our previous members on the team. We discussed with them what our objectives are and what we are currently working on, the acceleration sensor. The beagle was able to read for the first time acurrate voltages from the ADXL335 3-Axis Accelerometer. 2 500kohm resistors will be needed to act as the voltage divider from the sensor to the beagle. Tomorrow our goal is to get all 3 axes wired on a breadboard and complete the code to change the voltage read into a meaningful g value.