Posts

Showing posts from 2016

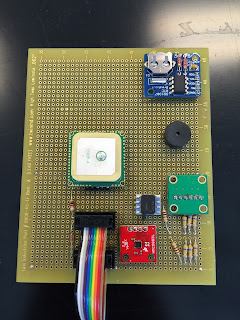
WEEK ELEVEN: August 1, 2016 TETHERED LAUNCH #2 RESULTS

Image
The pressure sensor was not functional prior to launch and we will trouble shoot that component before the next launch. All other components worked properly and had data that made sense. The only exception was at time 12:10 when the payload struck the ground and caused the components to begin writing erroneous data. The erroneous data maintained it's single value for approximately 43 minutes and then all components began giving correct data once again. Please see the graphs for the data that was written from the launch. The GoPro that was facing upward overheated and shut off after 40 minutes of run time due to the fact that it was in direct sunlight for the duration of the test flight. During the main launch the GoPro overheating won't be a problem because it will ascend at a rate which will take it into cooler temperatures within 20 minutes of launch. Spot GPS Data SUCCESS   Accelerometer Data SUCCESS aside from the "Concussion" GPS Data SUCCESS

WEEK TEN: July 26, 2016

1. Worked on the netting for the payload. ( Melissa ) 2. Troubleshoot the accelerometer. ( Everyone )

WEEK TEN: July 25, 2016

1. Worked on preparing the netting for the payload. ( Melissa, Sofia ) 2. Shimmed the GoPro cameras. ( Patrick ) 3. Worked on sound experiment. Increased duration of the output. ( Nicholas )

WEEK NINE: July 20, 2016

Image
1. Work on presentation. ( Everyone, mostly Patrick ) 2. Find website that calculates the fill volume, ascent rate, neck lift, and time to burst. The website is here . ( William ) SEE PICTURE 1 PICTURE 1 :   

WEEK NINE: July 19, 2016 - Pre Test Launch

Image
We made several modifications to the test launch for the test launch. We originally wanted the balloon tethered up to about 250 feet. However, the wind could apply enough drag force to break the 100-pound-test tether. To accommodate for this, we tripled the line and sent the balloon to about 75 feet up in the air. We had a lot of fun keeping the balloon from being blown into the ground. The BeagleBone recorded two hours of data while we prepared the payload and the balloon. Of the 30-45 minutes of flight time, the BeagleBone recorded 7-8 minutes of data. Our computer couldn't record data for the rest of the flight because its connection to the power supply loosened and the power supply itself wasn't properly secured. As for the components, they worked as intended except for the accelerometer. The two SpotGPS reported the balloon's location accurately. SEE SPOTGPS DATA . Despite the low flight altitude, the APRS managed to pinpoint its location as well. For some reason,

WEEK NINE: July 18, 2016

Image
1. Finished the procedure checklist. ( Sofia, Patrick ) 2. Finished the payload basket. ( Melissa ) SEE PICTURE 1 3. Tested the programs and equipment. ( Nick, Peter ) All the programs but the accelerometer program work as intended. For some reason, only the y-axis of the accelerometer reads a value of about -1.4 g regardless of the orientation.  A hardware connection is the prime suspect. 4. Brainstormed ways to attach the group picture to the bar for the final launch. ( Luis, Melissa, Patrick ) The best idea seems to be attaching the picture to an aluminum sheet and welding the sheet onto the bar. We also measured the ideal distance between the picture and the GoPro, which is 1 foot. 5. Attached picture to the bar for tomorrow's launch. ( Professor Balzarette, Melissa, Patrick ) We temporarily spray-glued the picture onto a sheet of ABS plastic and secured the sheet onto a notch in the bar with industrial strength hot glue. SEE PICTURE 2 We are now prepared for tomorrow

WEEK EIGHT: July 14, 2016

1. Begin developing a basket to secure the payload ( Melissa, Sofia, Peter, Robert ) SEE SLIDESHOW 2. Begin testing programs and equipment. ( Patrick ) 3. Develop procedure for balloon assembly at launch. ( Sofia ) 4. Assemble the 1.5 inch diameter inflator tube for the tethered launch. ( Luis ) Slideshow

WEEK EIGHT: July 13, 2016

Image
1. Look into the capacities of the balloons. ( Nick, Peter ) According to the company we purchased the balloons from, the capacities are:   2. Work on exploded view of and research methods to create a basket for the payload. ( Melissa ) We will work on the actual production of the basket tomorrow. 3. Assemble part of the inflation tube for the tethered launch. ( Luis, Professor Balzarette, Patrick ) Sand the lip of the tube, which will prevent any sharp edges from tearing the balloon. SEE PICTURE 1 4. Begin developing a step-by-step procedure of assembling the balloon and the payload at the launch site. ( Everyone )  Picture 1

WEEK EIGHT: July 12, 2016

Image
1. Researching methods for converting voltage to decibels. ( Nick, Patrick ) We found a method that looks promising, and we will continue experimenting with it tomorrow. 2. Continue work on the exploded view of the payload. (Melissa ) 3. Brainstorm ideas for attaching the payload. ( Everyone - William/Billy + Luis ) Since wrapping the entire box with duct tape may cause interference with our GPS sensors, securing the payload with a nylon netting would be best. 4. Experiment with a knotting technique -- the knot at 1:05 in the video below -- using fishing line. ( Everyone - Billy - Nick ) SEE PICTURES 1 & 2 5. Weigh the payload. With the modifications made from yesterday, the payload now weighs 5 pounds 14 ounces, which is below the maximum of 6 pounds. Picture 1 Picture 2

WEEK EIGHT: July 11, 2016

Image
1. Work on exploded view of the payload and components. ( Melissa ) 2. Modify the battery case. ( Sofia, Patrick ) SEE PICTURE 1 Picture 1

WEEK SEVEN: July 7, 2016

1. Test GPS sensor . GPS data, altitude included, is accurate. ( Nick, Sofia ) SUCCESS 2. Foam in cracks and crevices that impact the structural integrity of the payload. ( Sofia, Patrick ) 3. Research methods for converting the speaker voltage to decibels. Decibels may be inferred by calculating intensity. ( Everyone )

WEEK SEVEN: July 6, 2016

Image
1. Test on board GPS again. ( Everyone ) Works when you remove the time.sleep line in the code. 2. Foam in GoPro cradles. ( Patrick, William ) All pieces are foamed into the payload now. 3. Test accelerometer . ( Everyone ) Graph 1 are the test values for the x,y, and z axes. GRAPH 1 :

WEEK SEVEN: July 5, 2016

1. Test on board GPS . Initialize the GPS outside to see if that fixes the erroneous data. ( Patrick ) Worked the 3rd time. 2. Begin foaming in the 3D printed parts to obtain a fixed position and install the copper tubes for pressure equalization. ( Billy, Nick ) Both Spot GPS cradles, APRS cradle, circuit cradle, and beagle bone cradle have been foamed in. Will foam in the GoPro cradles tomorrow.

WEEK SIX: June 30, 2016

1. Tested all experiments during a drone flight. ( Everyone ) GPS program had bugs. Plotted wrong places at the wrong times. Sound experiment needs to be validated and tweaked. All other experiments worked and had valid data. 2. We are presenting on July 21st. ( Everyone ) 3. Took a picture. ( Everyone )

WEEK SIX: June 29, 2016

1. Troubleshoot errors for the four programs that did not work yesterday. To be resolved tomorrow. ( Nick, Patrick, Peter ) 2. Verified GoPro footage for continuity because of the heat issue. ( Billy ) SUCCESS. 3. Helped setup block house for tomorrow's news visit. ( Billy, Sofia, Patrick, Nick ) 4. Ran gps_raw data through gps_parse. ( Patrick ) 5. Ran every program for about 2 hours using the beaglebone and the small external battery. Results to be analyzed tomorrow. ( Nick )

WEEK SIX: June 28, 2016

Image
1. Assemble all the parts in the payload box and run everything for >3 hrs. ( Everyone )   SEE PICTURE 1. SUCCESS. 2. Make shell script for root chmod 744 start_experiments_without.com.sh ( Peter ) SUCCESS. 3. Test one battery for both Go Pro's and a smaller cylindrical battery for the Circuit Board and run them for 3 hrs. SUCCESS. 4. Weigh the payload box ( William ). The total weight is 5 pounds and 7 oz.  5. After the test, with more than 4 hrs running the Go Pro's , the battery only lost one dot.  PICTURE 1

WEEK SIX: June 27, 2016

Image
1. Rewire the input connections. (William) See PICTURE 1 2. Test the rewiring and ensure the programs and sensors function as intended. (Peter) 3. Assist the EEG team with their Python code for analyzing their data. (Nick, Patrick) 4. Prepared the payload for a 3+ hour test. (everyone) See PICTURE 2 Picture 1 Picture 2

WEEK FIVE: June 23, 2016

1. Tested battery eliminators and made sure that the GoPros run for at least 3 hours using an external battery. ( Nick, Patrick) 2. Worked on trying to get the wire for the sound experiment connected to pin 33. ( Billy) 3. Adjusted gain on mic/amplifier breakout board by turning screw counter clockwise all the way and then turning it back clockwise slightly. We used a tone generated by  http://onlinetonegenerator.com/ . Maximum volume produced a voltage difference of 1.65 V. ( Peter )

WEEK FIVE: June 22, 2016

Image
1. Soldered the sound experimen t onto the PCB ( William ) See PICTURE 1 2. Wrote code for the sound experiment . ( Peter ) 3. Edited all python scripts to write out errors to a file ( Nick ) PICTURE 1

WEEK FIVE: June 21, 2016

1. Tested how well the thermistors measured temperature. ( Professor Griffo, Patrick ) The external thermistor has an accurate read, whereas the internal thermistor is off by around 2 degrees Fahrenheit. 2. Tested the two spot GPS and the onboard GPS . ( Nick ) The two spot GPS successfully relay their positions in 2.5 minute intervals. Data from the onboard GPS will be compared to the spot GPS coordinates tomorrow due to the lag from BeagleBone 2. 3. Finished modifying the top GoPro case for proper fit. Also drilled holes through the back plates of both cases, which will allow cables to pass through and allow better access for positioning the GoPro. ( Patrick ) 4. Worked on GPS code ( Patrick ) 5. The sound experiment finally arrived! We will test it tomorrow

WEEK FIVE: June 20, 2016

Image
1. Cut hole through top part of payload for the GoPro . ( Sofia ) SEE PICTURE 1 & 2 2. Modify GoPro case for the top of the payload. ( Patrick ) 3. Go to home depot. ( Everyone ) 4. Sent Billy and Nick to 2 wrong stores. ( Patrick )       : ) 5. Work on a master program to initiate all other programs. ( Nick ) 6. Test adhesion of the foam and super glue with 3D printed parts. ( William ) The super glue DOES NOT work with the Styrofoam but the canned foam works exceptionally well with the Styrofoam. The super glue will work better to glue plastic pieces together. PICTURE 1 :   PICTURE 2 : 

WEEK FOUR: June 17, 2016

Image
1. Tested different recording angles for the GoPro . ( Sofia, Patrick ) Recording at 720p 60 FPS with a medium angle turned out to be the most optimal setting because it has a minimal fish-eye effect. See this link to see stills from videos in different modes 2. Cut out an opening in the payload for the GoPro to fit in and modified the GoPro case. ( Sofia, Patrick ) SUCCESS.  See PICTURES 1 and 2 PICTURE 1 PICTURE 2

WEEK FOUR: June 14, 2016

1. Test Spot GPS units. Button functionality and make sure that the Spot GPS units are getting a hit every 5 minutes. ( William ) SUCCESS          Process to use Spot GPS units:        1. Turn on the Spot GPS labeled STEM 1.        2. Hold down the Track button (Button with the boot prints) until it flashes green.        3. Approximately 2 and 1/2 minutes later repeat the process for the Spot GPS labeled STEM 2.   2. Fine tune the fit for the GoPro cases and the battery cases . ( Peter, Patrick, Sofia ) SUCCESS 3. Figure out how to get the "tour" function on Google Earth to work with the APRS data . ( Patrick, Nick, Peter ) 4. Cut and fit straps for the APRS well and the Spot GPS wells. ( William, Sofia ) SUCCESS 5. Updated code for all programs except GPS and Microphone so that errors will be written to separate files. Made code more appealing and easily readable. ( Nick )

WEEK FOUR: June 13, 2016

1. Test GPS on circuit board. Good readings except for the altitude. Altitude results are incorrect. ( Patrick ) 2. Test fly the 2 Spot GPS units and the APRS unit on the drone. ( Everyone ) 3. Modify GoPro inside case. ( Patrick )  4. Update firmware on Spot GPS and change tracking rate to every 5 mins. The website to download the application to update the firmware and settings is here . ( William )  5. Worked on a program to separate the data from the GPS units into 5 separate files. ( Patrick )

WEEK THREE: June 9, 2016

Image
1. Cut out inlays for the APRS case and spot GPS case. ( Sofia ) SEE PICTURES 1 AND 2 SUCCESS 2. Weigh the APRS with the batteries installed, the mass is 453.6g. ( Sofia ) 3. Worked on the GPS code . ( Nick, Patrick )     Important notes on the gps_raw.py script: Unlike every other program, gps_raw.py opens two files out of concern for the serial bus. If there were two programs running at the same time and making use of the same serial port, the serial might become busy, causing the programs to fail in reading the nmea sentences off the gps.  gps_raw.py will only work when two conditions are met: 1) the microSD card is mounted onto the beaglebone and 2) the microSD card is set to read and write mode . If the microSD card is locked you MUST unlock it with the  SD card adapter. To unlock the microSD card: Insert microSD card into the SD card adapter Flip the switch up   Insert the adapter into a computer (only when the card is in the adapter and mounted onto a comp

WEEK THREE: June 8, 2016

Image
1. Re-solder the external thermistor and design a way to reinforce it so it doesn't break again. ( William ) SEE PICTURE 1 2. Work on GPS code to trouble shoot. ( Nick, Patrick ) 3. Install clock software. ( Peter ) 4. Alter GoPro case so the GoPro fits into the case. ( William ) SEE PICTURE 2 5. Important info for spot GPS and APRS.      APRS : Call sign is KD2IVU and website is here .      Spot GPS : Website for tracking is here . Login for the Spot GPS account is here . The owner's         manual for the Spot Gen3 GPS is here .       Usernames and passwords are here . PICTURE 1 : PICTURE 2 :

WEEK THREE: June 7, 2016

Image
1.  3D print circuit board and upper battery pieces. ( William ) SEE PICTURES 1 AND 2 2. Finished error handling for the code except for the sound experiment. ( Nick, Patrick ) 3. GPS stuff. ( Patrick, Nick ) 4. Played the chemistry game again. ( Sofia ) 5. Alter Beagle Bone case to fit with the ribbons attached. ( William, Sofia ) SEE PICTURE 3 PICTURE 1 : Circuit Board SUCCESS PICTURE 2 : Battery Upper Pieces  SUCCESS PICTURE 3 : Altered Beagle Bone Case  SUCCESS

WEEK THREE: June 6, 2016

1. Figured out how to write coordinates on to Google Earth. ( Patrick ) The latitude and longitude need to be converted from degree decimal minutes (DDM) format to decimal degrees (DD) format. These two along with the altitude, need to be placed into a .kml file in a specific order: longitude, latitude, altitude. The first link will show you exactly what you need to do: Lesson 25: Display Your GPS Data as Track on Google Earth   KML Tutorial   2. Design the components for the payload structures in Sketch Up and tested printing the battery top rear component. ( William ) The process to print is:         ATTENTION!!!!! MEASURE AND DESIGN EVERYTHING IN METRIC!!!!           (The MakerBot software doesn't play well with standard measurements and causes issues with              conversion.) Convert the .skp file from Sketch Up to a .dae file using this website . Download the MakerBot software from this website .  Open the MakerBot software. Add the file into the MakerBot pro

WEEK TWO: June 2, 2016

Image
1. Worked on designing the pieces that need to be 3D printed. ( Everyone ) 2. Figured out how to stream the live footage from the GoPros to a laptop for alignment purposes during installation using this link . Follow Method 1 (Use Google Chrome). If you don't have VLC, you can use QuickTime Player instead. To do so, open QuickTime Player and go to File > Open Location... Then, paste in the link and click open . ( Patrick ) 3. Started cutting out inlay spots for circuit board and spot GPS on the cover. ( William ) SEE PICTURE 1 4. Added a time stamp to the GPS code . ( Nick, Patrick, Peter ) 5. Worked on plotting the GPS coordinates onto google maps. Tested this by taking the GPS around the campus( Everyone ) SEE Lap Around BCC SUCCESS Plotting GPS coordinates You can create a map of your coordinates using Google My Maps . You'll need to import a file that contains your coordinates. We recommend using a .csv file for import because you can see the coordinates

WEEK TWO: June 1, 2016

1. Worked on error handling. ( Nick, Patrick, Peter ) 2. Worked on checklists. ( Sofia ) 3. Design partitions for payload. Measure dimensions of sections. New payload box inside dimensions are 11.43cm Height X 28.7cm Width X 18.85cm Depth.  ( Patrick, Sofia, William ) 4. Test GPS lock of circuit GPS LS20031 from within the payload box. Data sheet for the GPS is here . ( Everyone ) FAILED 1st try due to hardware issue. Tentative SUCCESS !! Works inside the payload box with the "upside down" orientation. We established a connection first and then closed the payload box. 5. Test pressure sensor outside. ( Everyone ) SUCCESS 6. Test external thermistor outside. ( Everyone ) SUCCESS 7. Test internal thermistor outside. ( Everyone ) SUCCESS 8. Test clock outside. ( Everyone ) SUCCESS 9. Test accelerometer outside. ( Everyone ) SUCCESS

WEEK TWO: May 31, 2016

Image
1. Create and send global P.O. for parts needed. ( William ) 2. Worked on error handling within the code. ( Patrick, Nick ) 3. Worked on checklists. ( Sofia ) 4. Untangled parachute and then tested. ( Everyone ) 5. Tested writing data to the SD card and onto computer. ( Patrick, Nick, Peter ) SUCCESS 6. Shelf designing liquefied our brains. So we decided to come up with a setup for the smaller payload box, thanks to Professor Benjamin. See PICTURE 1 for orientation. ( Patrick, William, Sofia ) PICTURE 1 :

WEEK ONE: May 26, 2016

Image
1. Test and format SD cards (Format to MSDOS (Fat)). ( Nick ) 2. Watched videos from the Bergen Academy launch to work on the checklists. ( Sofia, Nick ) 3. Brainstorm for lattice design and component cases. Use PLA and MakerBot. Styrofoam payload box inside dimensions are approximately 10 1/4" X 5 3/4" X 15 1/2" ( Sofia, Nick, Patrick, William ) 4. Sketch and dimension ideas for lattice design. ( Patrick, William ) See PICTURES 1 and 2 5. "Unbrick" beaglebone #1. The beaglebone was not functional and is now fully functional. If the BeagleBone is "bricked" follow the instructions from the blog post on Thursday, July 2, 2015. Then follow the directions on  https://beagleboard.org/latest-images  to remove the # in order to flash the image onto the beaglebone. In the /boot/uEnv.txt file, the # must be removed must be in front of 'cmdline=init=/opt/scripts/tools/eMMC/init-eMMC-flasher-v3.sh' https://beagleboard.org/latest-images ( Pe

WEEK ONE: May 25, 2016

Image
1. Magnetometer was disconnected from the circuit but left soldered on the board in case we decide to use it again. The clock was integrated into the circuit. The old sound experiment was removed. See PICTURE 1 as a reference for what the front of the board looks like now and PICTURE 2 for the reverse side. 2. Tested functionality of the external thermistor . ( Patrick, Nick ) SUCCESS 3. Integrated speaker into the circuit. ( William ) SUCCESS 4. Tested functionality of the speaker . ( Patrick ) SUCCESS 5. Updated pressure sensor code to write out to one file. ( Nick ) 6. Worked on Checklists . ( Sofia ) 7. Re-soldered external thermistor and put sleeves on the wiring. ( William ) See PICTURE 3 8. Sent P.O. request for 4 32G Extreme Plus  MicroSDHC UHS-I cards. ( William )   9. Worked on error handling for external thermistor and tested. ( Patrick ) SUCCESS   10. Started working on error handling for the pressure sensor. ( Nick )   PICTURE 1 : PICTUR

WEEK ONE: May 24, 2016

Image
1. Removed old sound experiment from board. ( William ) SUCCESS 2. Worked on timeline. ( Patrick, William ) SEE PICTURE 1 3. Removed magnetometer from the circuit. ( William ) SUCCESS 4. Installed clock into the circuit. Helpful link here .( William ) SUCCESS 5. Cleaned up code for accelerometer , added comments and changed the output from printing in a ZYX format to printing in an XYZ format. Accelerometer program finished. ( Patrick ) 6. Tested Pressure sensor and modified code to write out to a file. ( Nick, Peter ) SUCCESS 7. Tested clock integration. ( Nick, Peter ) SUCCESS 8. Figured out how to set date on the beaglebone. NOTE: Has to be in GMT and military. This link helped to determine the process. ( Nick, Peter ) 9. Worked on code for the internal thermistor and tested functionality. ( Peter, Nick ) SUCCESS 10. Worked on code for the external thermistor but did not test functionality. ( Patrick ) PICTURE 1 :

WEEK ONE: May 23, 2016

Image
1. Started testing experiments for communication with the software. Current Sound Experiment will be removed from the board to be replaced with new sound experiment that is consolidated. (  New sound experiment ) ( William ) Speaker tested for production of 3.8kHz tone. ( Nick, William, Peter ) SUCCESS                    See Picture 1. Reference code for the speaker  here. Accelerometer test was a SUCCESS . ( Patrick )  2. Started "Build Checklist" and "Pre-Launch checklist". ( William, Hiten from Rocketry ) 3. Sent P.O. request for 4 go-pro cases. ( William, Peter ) 4. Sent introductory email. ( William ) 5. Sent reminder email to Luis for sound experiment order confirmation. ( Peter ) 6. Created a new accelerometer program but did not overwrite old accelerometer program. New program is accel_patm7edit.py ( Patrick )  7. Noticed that the accelerometer is installed upside down and rotated about the x-axis which makes the the y-axis orientation o

Sound Program

Today we updated the program that reads the raw voltage from the mic on the circuit board. It takes a 1000 readings (cycles) putting each reading into an array, and then writes to a file the maximum and minimum values. We need to get a speaker, hook it up to the BeagleBone Black, and then produce a sound. See the post on "Sound Experiment Components." http://bergenballoon.blogspot.com/2016/01/sound-experiment-components.html

DS1307 Real Time Clock for Beaglebone

DS1307 Real Time clock Clock and Adafruiit Breakout Board DS1307 DataSheet
Accelerometer Data sheet  https://www.sparkfun.com/datasheets/Components/SMD/adxl335.pdf

High Altitude Balloon site

Website for High Altitude Balloons

Sound Experiment Components

Image
Connect red wire to red ribbon wire. From ribbon, connect 2nd pin from top right to third from bottom right.